|
Closed
|
Case #
|
10030
|
|
Affiliated Job:
|
BaBaDou DOT Com
|

|
|
Opened:
|
Thursday, February 25, 2010
|
|
Closed:
|
Thursday, February 25, 2010
|
|
Total Hit Count:
|
30019
|
|
Last Hit:
|
Saturday, April 20, 2024 2:14:19 AM
|
|
Unique Hit Count:
|
6863
|
|
Last Unique Hit:
|
Saturday, April 20, 2024 2:14:19 AM
|
|
Case Type(s):
|
Helpdesk, Server, Network
|
|
|
Case Notes(s):
|
All cases are posted for review purposes only. Any implementations should be performed at your own risk.
|
|
|
|
Project:
|
I own a MacBook Pro, which for hardware, is a fantastic piece of equipment. I cannot say I am a fan of OSX however. So I will primarily run Windows 7 through a boot camp session. I do like the iTunes and the features offered with iPhoto; therefore, I will sync my iPhone on the OSX side. So in my research, I wanted a way to boot my OSX partition in a VM while in Windows 7 - connect it to a USB interface connecting my iPhone so I could keep it synced through this VM session.
Parallel desktops offers the ability to boot a separate partition (rather than a virtual hard disk file) in a VM on the Mac side; therefore, I wanted to do the same on the windows side - booting my OSX physical partition within a VM. Booting Vista or Windows 7 in a VM on the Mac side is far too cumbersome and slow, I have found doing the reverse (OSX in a VM) offers much better performance, I believe since OSX is a Linux operating system.
|
|
|
Action(s) Performed:
|
|
Total Action(s): 2
|
|
Action #
|
Recorded Date
|
Type
|
Hit(s)
|
User
|
Expand Details
|
|
10115
|
4/21/2010 9:56:13 AM
|
Helpdesk
|
3386
|
contact@danieljchu.com
|
OSX in a VM
There is a VM hardware configuration already constructe Collapse ...
|
Last Hit: Friday, April 19, 2024 11:48:42 PM
OSX in a VM
There is a VM hardware configuration already constructed and available for download online which does just this. It requires:
| - | Windows XP/Vista or 7 (Have install DVD available) | | - | VMware Workstation 7 | | - | Snowy_Vmware_files.tar (Available for download - I found through a Google search) | | | o | VM Hardware Config for the Mac OSX | | o | Bootable iso image required to start the VM session each time |
| | - | OSX Software Install DVD (If you plan to create a new virtual hard disk) | | - | Direct Disk (Because we have to change info on the partition before booting the OSX VM) |
OSX 10.6 is 64-bit, but I have performed this on two machines - both a 32-bit and 64-bit machine. I first tested out the procedures on a 32-bit x86 machine running Windows XP. This required me to use the OSX installation CD to build my instance. The next step was to try it on my MacBook Pro running Windows 7 through boot camp. I wouldn't need the OSX installation CD since in this case I want to use my already installed OSX partition. The steps below are for running the OSX partition on a Windows installation on a MacBook Pro. NOTE: do the Direct Disk step at your own risk, and have a Windows 7 bootable install CD nearby when you do.
| - | While boot camped into Windows, install VMware Workstation 7, followed up with all updates available | | - | Download and uncompress the "Snowy_Vmware_files.tar" file | | | o | Inside you will find a zip file continue and uncompress this | | o | Inside this you will find a "Mac OS X Server 10.6 (experimental).vmwarevm" folder, rename this folder to something like "MAC OSX" and move it along with the other two files (darwin_snow.iso & EnsoniqAudioPCI.mpkg.tar.gz) to where you plan to store your VM instances |
| | - | Open VMware Workstation and select "File" - "Open" - Select the "Mac OS X Server 10.6 (experimental).vmx" (not the file beginning with "._Mac.") | | - | You should now see the new VM instance "Mac OS X 10.6 (experimental)," edit the settings to this VM accordingly (Memory, # of CPUs etc) | | - | You need to change your "CD/DVD (IDE)" to "Connect at power on" - "Use ISO image file" and select the "darwin_snow.iso" - this is required to boot your VM instance | | | o | Not sure what is the default, but you will want it to boot the CD-ROM first, if when you boot for the first time it doesn't, to gain access to the BIOs of the VM to change the boot order add the following to the "Mac OS X Server 10.6 (experimental).vmx" file (edit with wordpad) | | o | bios.forceSetupOnce = "TRUE" |
| | - | In my case, I removed the "Hard Disk (SCSI)" because I am adding the physical Mac OSX partition | | | o | Add - Hard Disk - "Use a physical disk.." - "PhysicalDrive0" & "Use individual partitions" - Select the HFS+ partition which is likely "Partition 1" - Label the config vmdk file and click "Finish" | | o | i.e. in my case I have a 500GB drive | | o | Partition 0 is 200 MB (Unknown) | | o | Partition 1 is 315 GB (HFS+) <- my Mac OS | | o | Partition 2 is 150 GB (NTFS) |
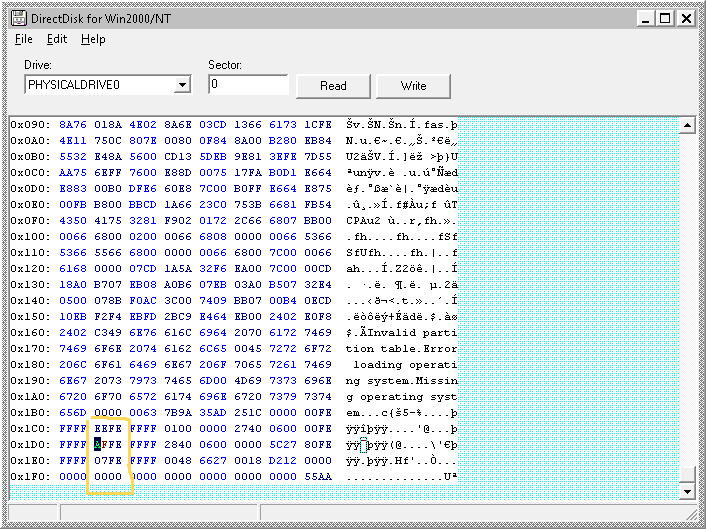
| | - | Windows Vista and 7 lock the drives it recognizes upon boot; therefore, we need to force these versions of Windows to see the Mac OS partition as unpartition drive space. Based on my reading, this step can be skipped if your boot camped version of Windows is XP. | | | o | Here you will need Direct Disk or an equivalent of it. Be sure to run this as administrator | | o | Read in the PHYSICALDRIVE0 information by selecting it in the "Drive" drop down, Sector "0" and clicking "Read" | | o | As the image illustrates below, you are looking for "AF" - as with my partitions setup they are set as: | | | - 4 Primary Partitions to each Disk | | | - EEFE (Unknown) | | | - AFFE (HFS+) | | | - 07FE (NTFS) | | | - 0000 (No 4th Partition) | | o | Backup the boot table - File - "Save to file." and save a copy of this information before making any changes | | o | You need to change the "AF" to "00" - File - Uncheck "Safety Lock" - Click "OK" to acknowledge that safeties are off - Find the "AFFE" and change the "AF" to "00" | | o | Click "Write" to commit your changes | | o | Open a command prompt as administrator | | o | Type "diskpart" | | o | At the "DISKPART>" prompt type "rescan" | | o | Windows will now see the Mac OS as unpartitioned disk space, release it's lock and allow you to boot your VM | | o | Once the VM is boot, you need to reverse the changes made above. Simple follow the same procedure changing the following | | | - Change the "00" back to "AF" | | | - Do not perform the diskpart/rescan instructions until the VM is turned off | | o | I have had a single occurrence where after performing the above, my physical system failed to boot back into Windows (the Mac OS booted just fine) - if this should occur, the fix for me was popping in the Windows 7 installation DVD, selecting to recover the boot information and everything was fixed and once again booting just fine. Remember to change the boot settings in Boot Camp in OSX to boot from CD |
| | - | Once in your OSX VM, audio may not work - this is what the "EnsoniqAudioPCI.mpkg.tar.gz" file is for. Install this into your OSX VM instance and audio should begin to work. It does not appear to affect the Mac OS when you physically boot into OSX | | - | Some things to note: | | | o | Your network MAC of OSX will change - this may be avoided by changing the type of network connection the VM uses, I have not tried this. But because of this - along with the physical hardware changes of the OS - using iTunes will see this VM instance as a new machine which you will have to authorize. This isn't a problem unless you are at your limit of 5 machines | | o | You can connect USB devices to the VM instance so you can sync - it is a little finicky - but I have had it work - I think you need to make sure the phone and it's storage are connected to the VM |
|
|
|
|
10116
|
4/21/2010 9:55:13 AM
|
Helpdesk
|
3172
|
contact@danieljchu.com
|
My thoughts of Apple vrs Microsoft
In my opinion the difference b More ...
|
|
|
|
Outcome:
|
|
This was more of an endeavor to see how it worked rather than using it frequently - because of the interruption in Windows boot I have been careful how often I do it; however, I only experienced that once - the first time. Also like I mentioned, the goal was to sync my phone in the OS and it is a little finicky so I find it is more trouble to me then just physically booting up the Mac OS. But it does work and performance wise, much better then Windows in a VM under Mac OSX.
|
|
|
|
|
|
|
|